GARRETT LUU
Why Am I Studying CS?
2020.2.19
So recently I’ve been dealing with a bit of a career crisis of sorts, stemming from one critical thing I’ve noticed about myself: coding isn’t fun for me anymore.
Honestly, I’m probably experiencing some kind of burnout or slump, but it got me thinking about what I truly enjoy studying. Between learning real analysis, doing reduction proofs, and deriving graph algorithms, I found myself loving pure math. The CS theory classes dreaded by everyone else became incredibly fun. Writing proofs became way more interesting than writing code. I don’t necessarily want to pursue pure math and go into academia though, but the path to being a software engineer now seems a bit more muddy than expected. It got me thinking about why I was pursuing CS and what I was hoping to learn from my classes.
On a related note, I recently came across an article titled "10 reasons to ignore computer science degrees," which caught my eye as I’m a CS student. The article mentions some key points, including how CS theory differs from software engineering, and how most CS programs offer very little in the realm of practical knowledge—for example, UCSD doesn’t offer any courses on popular shiny new tech such as React or Node.js. While I agree to a certain extent about these claims, the author fails to grasp the fundamental purpose of a CS degree (and university education, to a greater extent): to produce strong thinkers, problem solvers, and engineers, not merely coders.
Before I continue, I just want to clarify what I mean by the terms “engineer” versus “coder.” Isn’t it all the same thing? A software engineer writes code. A coder writes code. What exactly do you mean? I I think it’s best to describe this with an analogy: an automotive engineer versus a mechanic. It’s pretty clear what the difference is between these professions; an automotive engineer might design cars from scratch, while a mechanic is responsible for building, fixing, and maintaining cars. The full breadth of knowledge that an automotive engineer has isn’t really needed by the mechanic. But at the same time, if you ask a mechanic to design a car completely from scratch, he/she might have some trouble. The same applies in the software world.
Why make this distinction? What’s important here is that CS programs are not necessarily meant to produce the best coders, but rather strong software engineers with a very broad knowledge of the field of computer science. It’s very easy to watch a video or tinker with a project to learn the fundamentals of Java, but not quite as easy to learn the concepts of OOP and the principles of OOD.
The other day I had a chat with some friends, and one of them said something that actually got me thinking: “I’m actually glad that this school doesn’t offer a class on something like React, ‘cause that would be stupid. You can learn React on your own or on the job, but you can’t learn how to think in the span of a few hours.”
“This is what separates us from people taking free online courses,” someone else added.
In contrast to the article I mentioned, I completely agree with this idea. What’s most important in software engineering is the concepts, not necessarily the tech that goes into implementing them. This is why technical interview questions focus on problem solving rather than technical knowledge. While you don’t (and probably won’t) necessarily use Red-Black Trees in a front-end dev position, it’s still a useful tool to test your thinking and problem solving skills.
With all this in mind, I’m planning on taking a new approach to what I’m hoping to get out of college. Classes are for cultivating my thinking and problem solving skills, while hackathons and projects are for developing practical knowledge and learning new tech. Even with my self-proclaimed dislike for coding, I still don’t have an intention to change careers; I still love everything about CS, and I still want to go into software development. I would just rather concern myself with the high-level concepts rather than the low-level implementation details. I know I’ll get over this phase soon, but it really made me appreciate CS a lot more and think deeper about why I wanted to pursue this field.
"Uh, who just pushed to master?" - A Hackathon Experience
2019.9.20
It's been a while since I updated this site. Summer is winding down and the new school year is about to start for me, which means new classes, friends, and experiences. While first year did not go as smoothly as I wanted, I hope that I will take what I learned and make the next school year even better! With that in mind, today I just want to recount my first experience in a software hackathon, HackXX. I attended HARD Hack in the past, but it was more of a hardware-oriented, perfect for CE and EE majors but less ideal for a CS guy like me. It was still fun, not really quite what I was looking for in a hackathon.

With HackXX, I got the opportunity to attend my first software hackathon. HackXX is a women-centric hackathon, with the goal of promoting gender equality in CS. I worked in a team of four as before, but everyone else on my team had relatively little experience, so it was an additional challenge. With this in mind, we decided from the beginning to build a web app, since they are cross-platform, fast, and easy to build, especially front-end with the intuitive-ness of HTML and CSS. No need to deal with views, fragments, activities, or any other quirks of mobile development. Coupled with the lax syntax of JS, it becomes clear why web dev is great for beginners.
We started off by brainstorming for app ideas and also getting everyone up to speed on the basics of HTML, CSS, and front-end JS, as well as best practices for Git, since it was obvious that we would need to be sharing code and working on the same project. After some debate, we settled on a carpooling app, similar to Uber but "open-source", allowing anyone to offer rides. I assigned everyone to each work on a page on the site, while I was responsible for the back-end. Overall, our app formed a FEN (Firebase, Express, Node, and vanilla HTML) stack. React or Angular was also a possibility, but I didn't want to overcomplicate things. With this in mind, we got to work and started coding.
It was a long 20 hours. Things did not go as smoothly as planned, but that was to be expected. With limited knowledge of how Firebase worked, hooking up the backend was quite the chore. Since we wanted to use location to search for users and destinations, we also needed to use the Google Maps API, which I also had limited experience with. We had never really done a full-stack web application in the past, so all of this was new to us. The Git repo was also starting to become disorganized, as we created more feature branches and tried to resolve merge conflicts.
All of this continued through the night. A good portion of hackers left the venue to get some valuable sleep, but we simply had too much left to do. I downed two bottles of 5-hour energy (something no one should ever do) and continued. In the midst of our exhaustion, I noticed something strange in our repo: some commits in the master branch that weren't there before. "Uh, who just pushed to master?" I said, confused and tired. One of our teammates pushed something he was working on to master instead of his own branch. I tried to fix this by merging master's changes into his branch, and rolling back the commits on master. Unfortunately, this removed some of his other changes, and we lost some valuable time. In our defense, it's pretty hard to manage a Git repo at 4am.
By morning, we had not really finished what we had planned, but we still decided to demo. We didn't have much to show, and our public speaking skills were basically gone at this point, but we still made it through. In conclusion, though, we managed to learn a lot, gaining value experience in full-stack web development, as well as collaborating through Git. It was quite the fun experience; despite how exhausted I was, I would gladly do it again!
Anyway, that was how my first software hackathon went, and maybe it might encourage you to participate in one as well. If you want to check out the project we built, click here! We made a few extra commits after the hackathon, but the repo has gone a bit quiet recently. We'll probably continue to work on it someday, since it's quite a novel idea and a fun project.
Building Web Applications with the FERN Stack - Basic Setup
2019.7.29
Most people by now have probably heard of or had experience with the MEAN stack or MERN stack before. If you haven't, MEAN stands for MongoDB, Express, Angular, and Node.js. Each of these components is important to building a full-stack web application; Angular for the client, Express and Node for the server, which interfaces with MongoDB, the database. The MERN stack is the same, but replaces Angular with React, and is quickly gaining popularity due to the flexibility of React.
With these basics in mind, I would like to introduce the FERN stack. Similar to the MERN stack, but Google's Firebase is used in place of MongoDB. Traditional database setups are very difficult to manage, requiring developers to deal with security, scaling, and user authentication among other things. Firebase handles all of that for you, packaged into a nice and (relatively) easy-to-use API.
While I won't go over every feature of Firebase, we'll start by setting some things up and creating a skeleton application which will serve as scaffolding for any future FERN applications that you would want to build.
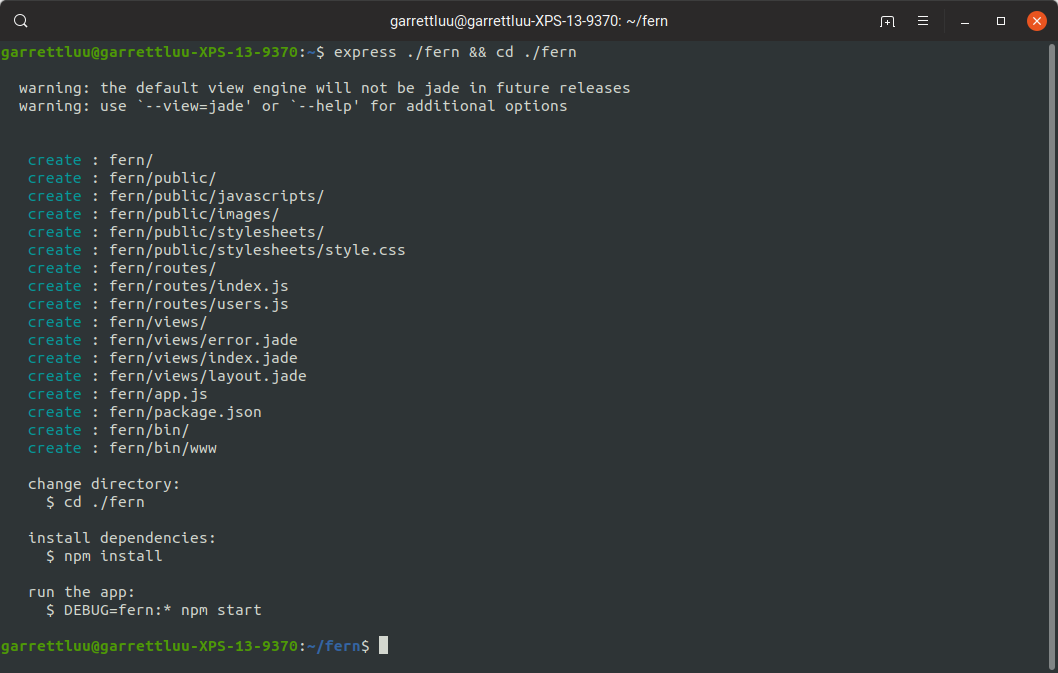
We'll start by creating our Express app using the express generator. Start by opening your terminal
and running npm install -g express-generator and then running
express ./fern && cd ./fern to create the Express app. This will serve as our backend.
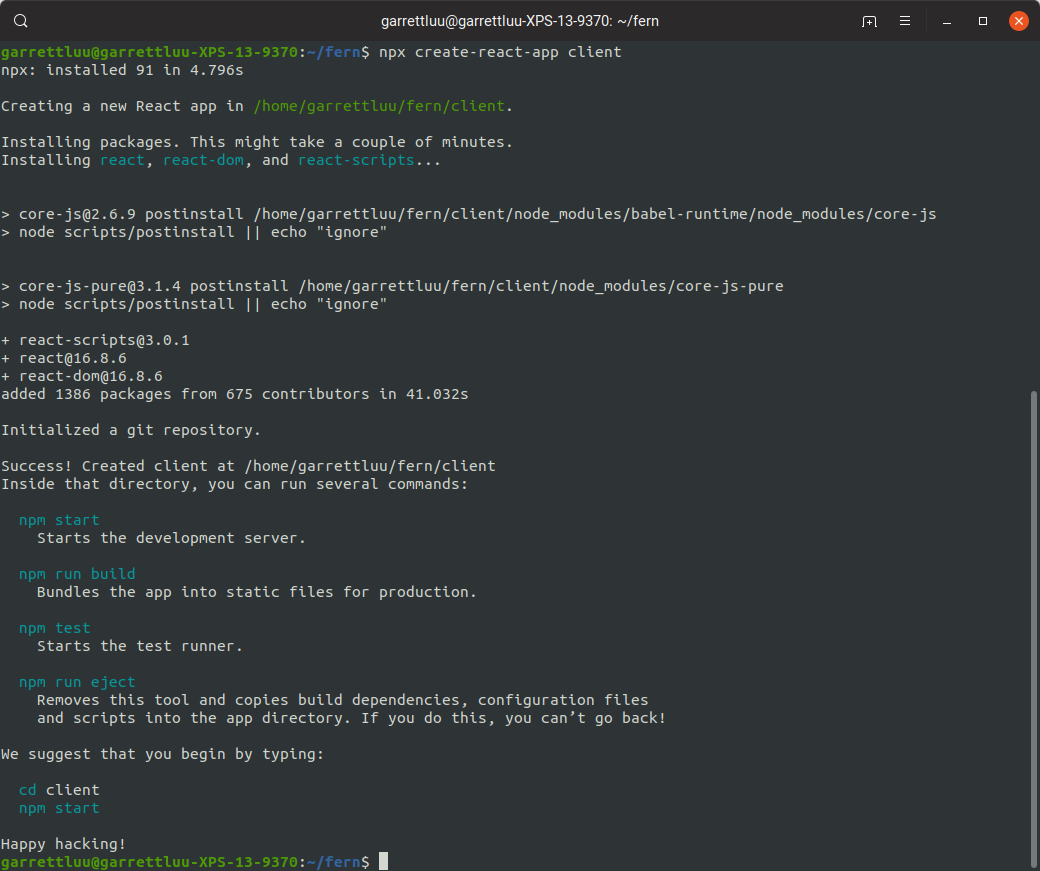
The next step is generate the React client, which can be done easily by running the command
npx create-react-app client. This will create a React client in a folder named "client",
and is what will contain all of our front-end code.
At this point, we have each component set up, but now we need to make them work together and talk to
each other. cd into your client directory and open up your package.json with
your favorite editor. Change the start script to be
set PORT=3000 && react-scripts start. This is to ensure that our client runs on the correct
port.
Next up, we need to change the port of the server to 3001 so that it doesn't overlap with the client.
cd into the bin directory and open up the www file with your favorite editor.
Change the port to 3000 by replacing the var port with
var port = normalizePort(process.env.PORT || '3001');.

Close the file and open up the server's package.json. Change the start script to be
"start": "concurrently \"node ./bin/www\" \"cd ./client && npm start\"",. This is
to run the client and server together in one command. Be sure to run
npm install concurrently --save to install concurrently.
At this point, most of the setup is complete. All we need to do is to add Firebase to our application. Create a Firebase project from the Firebase console. You can follow the instructions here to set up Firebase in your backend Node server. (I will update this entry in the future with more specific instructions).
Once that is done, the basic structure of your FERN application should be complete! The basic skeleton application is built, and now you can use it to build whatever application you desire. Be sure to read the Firebase docs thoroughly to get a good understanding of how it all works. This is a general overview of how to build a FERN application, but the concept can really be easily applied to any solution stack you choose to use.
3D Graphing, Rotations, and Projections
2019.3.24
About a year ago, I started work on R3, a 3D grapher for the TI-84 Plus CE, and it was one of my most ambitious projects. I had no real knowledge of how 3D graphics worked, or much knowledge about math in 3D in general. However, now that I've had a chance to study the math more closely, I decided to reboot this project, cleaning up code and adding more features.
In terms of code cleanup, my code from two years ago compared to now would be completely different. In R3's code, nothing was commented, magic number and strings were used freely, and I had no qualms about using a "goto" statement in the control flow. Not good. My first quarter in college has made me more aware of industry practices and the readability of code, so a huge refactor would need to be done before adding any new code.
A few weeks later, and the Cuboid project was born. Cuboid is meant to be an intuitive way to handle 3D graphics on the CE. Vectors represent 3D points in space, pixels represent actual points on the 2D plane of the screen, and projections are ways of going from 3D to 2D. I also plan to add other features as well, including linear transformations from R3 to R3 (and possibly between dimensions) and an infix expression parser
The mathematics involving this stuff isn't actually that hard to understand, and involves some very basic linear algebra and matrix multiplication to derive some of the equations I used. For rotating points, the vector was multiplied with the corresponding rotation matrix. Let's say we want to rotate some point \((x, y, z)\) about the y axis by some angle \(\theta\). All we need to do is compute this matrix multiplication:
$$\begin{bmatrix}\cos \theta & 0 & \sin \theta \\ 0 & 1 & 0 \\ -\sin \theta & 0 & \cos \theta \end{bmatrix} \cdot \begin{bmatrix} x \\ y \\ z \end{bmatrix} = \begin{bmatrix} x \cos \theta + z \sin \theta \\ y \\ -x \sin \theta + z \cos \theta \end{bmatrix} $$
The resulting vector we get in the end is our rotated point. Notice how since we rotated about the y-axis, the y coordinate of the new point remains unchanged from the original. The next step is to project that vector onto the 2D surface of the screen. The simplest is an orthographic projection, which essentially just "flattens" things against some arbitrary plane and scales them up by some scalar value. Perspective and foreshortening are not considered; in other words, an object will have the same apparent size no matter how far away it is from the camera. For example, let's try to project our point \((x, y, z)\) to our calculator screen. $$\begin{bmatrix} 1 & 0 & 0 \\ 0 & 0 & 1 \end{bmatrix} \cdot \begin{bmatrix} x \\ y \\ z \end{bmatrix} = \begin{bmatrix} x \\ z \end{bmatrix} $$ Seems deceptively simple, but there are a few adjustments we need to make. First, this scales each unit in the 3D world to one pixel on the screen, so we need to add a scaling factor if we want to see things more clearly. Next, we need to flip the y coordinate of the new pixel, since pixel coordinates start at the top and grow downward. Finally, we need an offset to properly center the projection, since \((0,0)\) starts at the top-left corner of the screen. $$s \cdot \begin{bmatrix} x \\ z \end{bmatrix} + \begin{bmatrix} 160 \\ 120 \end{bmatrix}$$
As you can see, these calculations are actually very basic and easy to understand, and implementing them in code would be very easy. Using C again gave me an opportunity to explore some of the nuances of the language, especially in regards to manipulating pointers. One main oddity I was unaware of in C was the use of function pointers, and how functions/methods themselves are a type and thus can be referenced through a pointer. This also meant function overloading was not possible, which is very different to what I was used to in Java. The main thing to keep in mind when dealing with pointers is to remember to free all memory used. Every malloc or calloc needs a corresponding call to free. It took me quite a while to get used to the use of pointers, and even now I still don't understand all of the edge cases involving them.
At this point in the project, all that is left to do is rewrite R3 using the new library, which (hopefully) offers better performance and cleaner code. With the knowledge and experience gained from this project, I want to be able to produce a production-quality final product. I am excited to continue working on this project once again. Let's see where this road takes me!
Shady Business and Sticky Situations (Web Development - Day 4)
2018.10.25
It's been a while since the last web development post, but there haven't really been changes to the site outside of content. Recently, however, I wanted to modify the nav bar of the site to better accommodate scrolling. In the past, if a visitor were to scroll all the way to the bottom of this page, and then wanted to visit my Projects page, they would have to scroll all the way back up before they can navigate to that page. This is obviously a flawed design, and worsens the user experience by forcing the user to take extra steps to navigate the site.
Enter the sticky nav bar. Same as a regular nav bar, until the user scrolls past it. The nav bar "sticks" to the top of the screen while the user continues scrolling. Perfect! Now you can scroll to the very bottom of the page and still have access to other pages without needing to go to the top. Alas, the world of web development is never that simple. Stopping at this point results in a functional but abrupt transition between the nav bar and the text on the page.

There are a few solutions to this. The easiest would be to make the nav bar a different color from the background of the page. This would create a clear border and a good transition between the content of the page and the bar. However, I want to keep the same color, so the other option would be a shadow, which provides a separation between the two elements.
Unfortunately, there is no official support for detecting when an element with sticky positioning is "stuck," so the only solutions available are just some hacks loosely slapped together. The simplest of these is using a white div to hide the shadow, and scrolls away to reveal the shadow. This solution feels like too much of a hack, and only provides a band-aid solution.
Perhaps the most robust solution is Google's own, using IntersectionObservers and creating their own method of detecting when a sticky element is "stuck." It's a very interesting read, and you can learn more about it here. While this is quite possibly the most elegant and proper solution, and something I would want to implement some time in the future, it wasn't the solution I went with.
The third option is actually very simple: set up a scroll listener and detect when the window has scrolled
past the nav bar. Thankfully, the code to set this up is very simple:
                function navBarShadowHandler() {

                    let navBar = $('.nav');

                    $(window).scroll(function () {

                        if ($(window).scrollTop() >= 286) {

                            navBar.addClass('shadow');

                        }

                        else {

                            navBar.removeClass('shadow');

                        }

                    });

                }
We read the scrollTop() value and see if it's above a certain number (this number can be anything; 286 was where my nav bar was).
If it is, then we
have scrolled past it, and thus we should add a shadow. The shadow CSS class simple contains a
box-shadow attribute, which you can read more about
here. I found that
box-shadow: 0 2px 4px 0 rgba(0, 0, 0, 0.2), 0 3px 10px 0 rgba(0, 0, 0, 0.19);
worked the best for creating a subtle but noticeable effect. After this, I slapped a quick .25 second
transition, and everything ran smoothly!
This solution is obviously not as perfect and well-built as Google's, but it gets the job done and can be set up much faster. The major downside is performance; the function inside the scroll event fires every time a user is scrolling (which is dozens and dozens of times a second). For a small site like this, the difference is somewhat negligible, but for a larger, more computationally intensive project, you can see how efficiency becomes much more important. The end goal would be to use the Google implementation, but I'm satisfied with the current solution for now.
New Beginnings, Old Friends, and Vim
2018.10.3
The orange glow of the sunset pierced the windows of Geisel Library. I looked up to admire the beauty before opening my laptop and taking a sip of tea.

It's been a while since the last post, but I've finally gotten situated in UCSD. Met some new people, caught up with some old friends, began the job/internship hunt, and joined some clubs. Currently studying computer science and taking a Java class, which has been pretty smooth so far. One thing that I've gotten somewhat adjusted to was the use of vim instead of an IDE for writing Java. The change was quite jarring at first, since vim does not offer the robust features of an IDE such as autocompletion and error checking, so I'm completely in the dark until compile time (and runtime for some more sneaky bugs!)
I have used vim in the past for some projects, including the 3D grapher project for the TI-84PCE. In that project, I wrote most of the initial code in vim before switching to CLion, and I just felt that vim was too obtuse and cumbersome to use compared to more modern text editors and IDEs. However, the shortcuts and navigation that once proved to be a barrier to usage became extremely second-nature, and I even began to try to use them when editing Google docs or navigating webpages.
Here's a tip for those trying to learn/use vim: use the shortcuts. It might seem strange at first, and you might need to constant look up a cheat sheet for basic things like selection, but after a while it becomes natural. For example, I started forcing myself to use HJKL instead of the arrow keys for navigation, which was odd at first, but became very convenient since those keys were right on the home row of the keyboard. Avoid using set mouse=a. Force yourself to use keyboard shortcuts to do everything, don't even touch your mouse/trackpad. It will be worth it in the end.
Thoughts on Kotlin
2018.6.29
Until Google announced official support for Kotlin back in Google I/O 2017, I never had real experience with the language beyond skimming through some documentation and "Hello World." It seemed like an interesting language, but I've just never used it enough to really say that I love it or hate it. With Google's announcement, I jumped at the chance to try it out for a full-scale project of making an Android app to be released on the Play Store. I've done some basic Android stuff in the past, but never on a scale like this, so I thought it would be fun to put some of the things I've learned into an actual project. It's definitely a daunting task, and I've been working on it on-and-off this past year with somewhat decent progress. Obviously, it's still no where near being done though!
Now that I had some time to work with the language, and I've begun to understand its strengths, weaknesses, and quirks, I think I have a pretty good grasp of Kotlin in general. There are still things that I'm discovering every day that make me say "wow that's convenient" or "that's a weird way of doing it." Here are some of my thoughts about some of the features and oddities of Kotlin.
Kotlin does for Java what Swift did for Objective C, as I like to see it. It tries to make things easier, more intuitive, and more convenient to use, while maintaining interoperability with Java so that you can easily integrate it into your projects. The syntax has some key differences, but the structure is still the same as Java (or any other OOPL, for that matter), with classes, methods, variables, etc. One of the key differences is the lack of semicolons at the end of lines, which makes me relieved to see, but I still find myself instinctively typing them in from muscle memory, even after nearly a year with the language. Variables are another key difference; for most cases, you can just use "var," and Kotlin will automatically determine what type of variable it is. You can also declare variables without initializing them, but you need the "lateinit" modifier for that, which I find rather unnecessary and annoying.
Switch-statements are now "when" statements, and have a slightly more simple syntax than before. I prefer this over the switch-statements of Java, which seem odd compared to the rest of the language with all the "case" and "break." If-statements still work as before, but now they also replace ternary operators and thus can return values. If for some reason you like making really complicated ternary statements that are entirely unreadable, Kotlin makes them a little easier for other people to understand. So some garbage like this
out = usesCeiling ? (out > 0.8) ? 0.8 : ((out < -0.8) ? -.8 : out) : out; // (ಥ﹏ಥ) (ʘᗩʘ')
becomes
out = if (usesCeiling) if ((out > 0.8)) 0.8 else (if ((out < -0.8)) -.8 else out) else out
Still somewhat hard to decipher, but less obtuse than the Java example.
The last thing I want to discuss is static methods, which is my least favorite part about Kotlin. In Java, static methods and variables are as easy as adding the "static" keyword in the variable declaration. With Kotlin, you have to declare a "companion object" and put all of your static variables and methods inside of that companion object. This just adds an unnecessary layer of complexity to the language. Innovation for innovation's sake isn't good, and I would've been more than satisfied with having kept the static keyword from Java.
Kotlin as a whole, however, is a breath of fresh air for Java, and I'm very glad it exists. I think that many of its features are convenient and great, with some minor oddities that I would like to see gone. For Android development, I have (for the most part) switched over to Kotlin. The change was easy to make, and being able to continue using old Java code alongside Kotlin is another bonus. Java will still have a place, but I see Kotlin as a suitable replacement.
Arcs and Splines - FRC Motion Profiling Part 1
2018.6.22
I updated some stuff on the site, but I want to talk about some non-web stuff today. I've been involved with FRC (FIRST Robotics Competition) for 4 years now, and I've done software for the last 2 years on my team (4322). This year, despite our limited resources, we were able to develop motion profiling during the build season, allowing for smooth driving during the Autonomous period of the game.
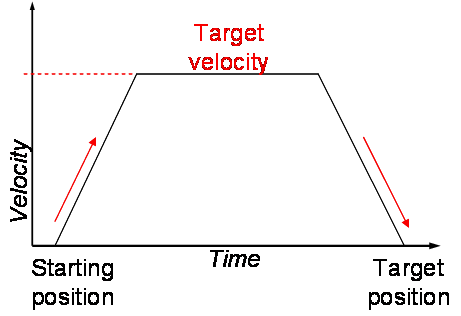
The concept of motion profiling is simple. Rather than the oscillating nature of a PID loop, we instead smoothly ramp up in velocity, cruise at a constant speed, then ramp back down smoothly to a stop. If we graphed out the velocity of the robot over time, we see a trapezoidal shape, which is why it's usually referred to as a trapezoidal motion profile.
Applying this in the straight-line case is simple. We simply generate the velocity and position values at every interval (e.g. every tenth of a second) and stream them to our motion controllers. With feedback from encoders, we can use a PID loop with feed forward to maintain our velocity. It does the job well, even with minimal tuning. The TalonSRX, which most teams (including mine) use, has built-in support for motion profiling, so just follow their examples that they provided and adapt it for your team's use case.
The fun comes when we apply this to the 2-D case, and suddenly many more questions arise. Specifically, what type of path/curve do we take to get to our location? How do we generate the points along the path? How do we get our robot to follow that path?
To start, we should consider what type of path our robot should follow. There are many types of curves and splines possible, such as polynomials, arcs, or even sine waves, but I think that the three most relevant are biarcs, cubic splines, and quintic splines. Biarcs are the simplest, and cubic and quintic splines are more complex but can produce smoother results. For the purposes of FRC, it really doesn't matter which one you use for 99% of cases as long as you keep the numbers reasonable.
Biarcs are the simplest for the robot to follow because it only involves one major speed change. They are made up of two arcs, which are pieces of circles, meaning that the robot can move at a constant speed after it ramps up due to the constant curvature. All you need to do is calculate the radius of each arc from the start and end angle, and use that number to determine your left and right wheel velocities. The only downside is the point between two arcs, where the robot needs to make a sudden instantaneous speed change, which can result in some jerkiness and slight oscillations.
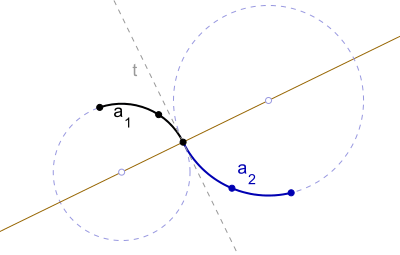
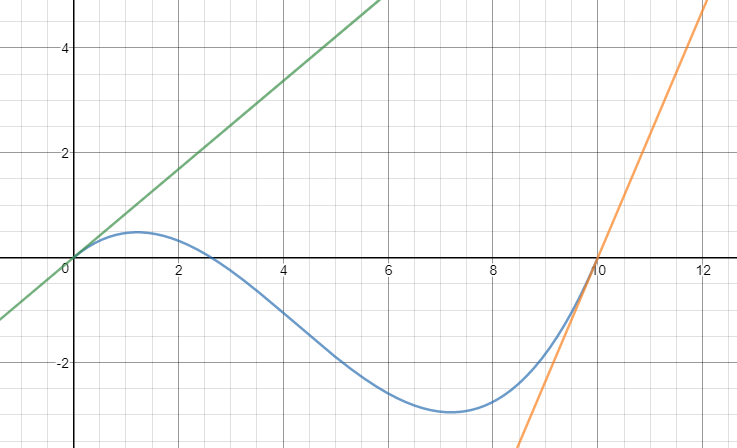
Splines, on the other hand, are easy to calculate and relatively easy to follow. In the case of quintic splines, we also get a benefit of smooth curvature, which results in minimal jerking but can result in weird paths due to the constraints. To calculate the spline, we need three numbers: the straight distance from your beginning and end, the starting angle, and the ending angle, both relative to the straight line formed from beginning to end. We'll call those \(D\), \(\theta_{1}\), and \(\theta_{2}\), respectively. To keep things simple, we'll put the start and end points on the x-axis. We just need to start with a general equation \(h(x) = ax^{3} + bx^{2} + cx + d\), then apply constraints: \(h(0) = 0\), \(h(D) = 0\), \(h'(0) = tan(\theta_{1})\), \(h'(D) = tan(\theta_{2})\). At this point, it becomes a system of equations, and can be solved using substitution or elimination, whichever you prefer. The quintic case is the same, only you'll set the second derivative to 0 at the beginning and end. I highly encourage you to take a look at this interactive demo I've created here if you want a visual.
Now that we have the paths we are going to use, what do we do with them? The next step is to create a trajectory, which means we are calculating our velocity and position at regular intervals along the curve. Generating these numbers will be covered in the next entry.
jQuery Fun and Newly Unearthed Bugs (Web Development - Day 3)
2018.6.20
Today was rather uneventful, but I made some major changes to how the animations between pages are handled. Gone is the cumbersome and overdesigned "game of catch," and now we have proper smooth transitions between pages using jQuery and smoothState.js. Page loads are completely invisible, providing a more seamless experience in navigating the site. smoothState.js is nice in that it allows for animations to be easily called whenever you want them to be called, such as when you click the link or when the page finishes loading. This means that you don't need to put eventlisteners everywhere to check when animations have finished, and also allows for better timing of animations.
The animations actually took longer than I initially thought to set up. After some fiddling, reading through what turned out to be deprecated examples, I got the page loading to be invisible, but the fade-out animation wasn't quite working. The fade-out was part of the .is-exiting class, which reverses the animation whatever you assigned it to. Turns out that the example used .m-scene.is-exiting, when .is-exiting is what actually worked. I just love it when people write things and provide inaccurate examples to supplement them.
jQuery is also going to allow me to do more interesting things. Currently, each image that has the click- to-zoom feature has its own JavaScript, which is going to get impractical as more and more images are added to the site. With jQuery, I can get elements from the page based on className rather than id, which will allow me to apply scripts to multiple elements of a class at the same time rather than having to individually copy code for each one.
Finally, it seems I've found some new bugs that I wasn't aware of before. The click-to-zoom feature causes the images to slip under the text of older blog posts. Images from older blog posts are fine if there's a newer post under it, but look like this when over older posts.
My hypothesis on this is that the older images have the same z-index (which I tried changing to 10, but that didn't work), and since the older entries occur later on the html file, they end up being "layered" on top and take priority over the newer entries.
However, as I was writing this, I decided to try some possible solutions. Putting the div for the zoomed image outside of the div for each blog entry turned out to be the correct way. We can now set the z-index of the zoomed image and the blog entries separately, so the zoomed images will always be on top. Who knew solutions could be so simple?
A Game of Catch (Web Development - Day 2)
2018.6.19
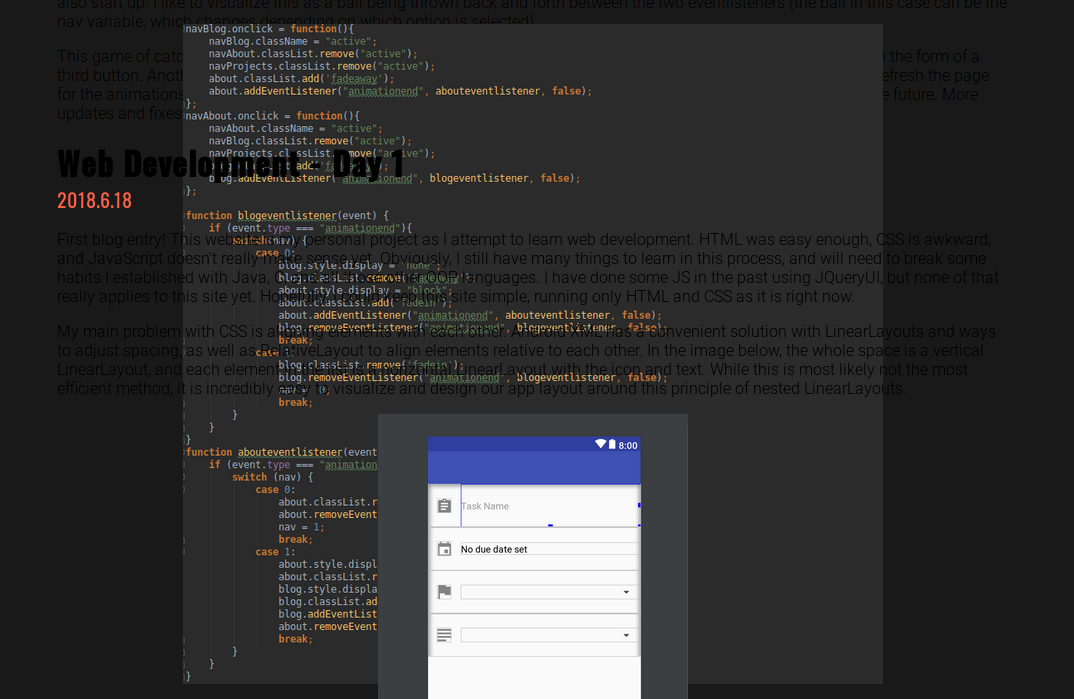
Testing out animations in JavaScript, and modified some parts of the site. You'll notice now that images have a click-to-zoom function, with some nice fade-in and fade-out animations to go along with it. I also experimented with a new way of handling navigation between pages. The site is now technically on one page, with fade transitions if you click on About and Blog (Projects is still not using this system). I came up with a clever, albeit inefficient way of handling this navigation and animations. Again, there's probably better ways to do this, but this is my solution for now.
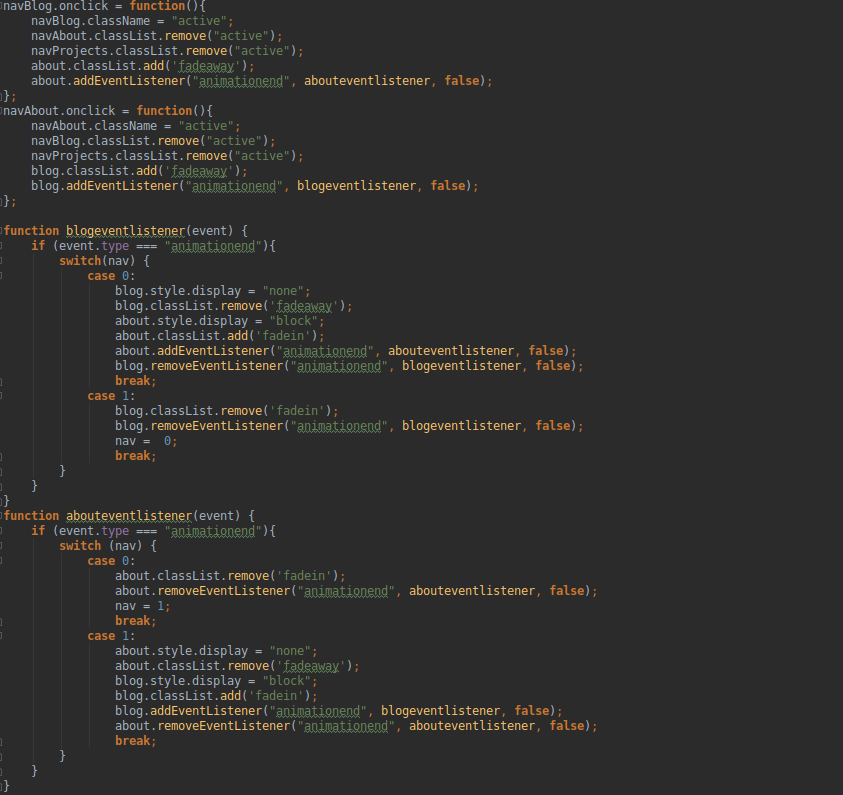
When you click on one of the buttons, the animation for the current block of text starts, and creates a new blogeventlistener that waits for the end of the animation. When the animation ends, the next animation is started up, and an abouteventlistener is created. Now, were are on the other page, so going back to the original involves creating an abouteventlistener, which causes the blogeventlistener to also start up. I like to visualize this as a ball being thrown back and forth between the two eventlisteners (the ball in this case can be the nav variable, which changes depending on which option is selected).
This game of catch is easy to replicate for two buttons, but becomes more difficult if we try to involve another player in the form of a third button. Another downside is that if you click the buttons too fast, the page will become stuck, and you'll need to refresh the page for the animations to work again. I'll try to find an easier, less insane way of implementing these fade animations in the future. More updates and fixes are coming soon.
Web Development - Day 1
2018.6.18
First blog entry! This website is my personal project as I attempt to learn web development. HTML was easy enough, CSS is awkward, and JavaScript doesn't really make sense yet. Obviously, I still have many things to learn in this process, and will need to break some habits I established with Java, C, and all those other OOP languages. I have done some JS in the past using JQueryUI, but none of that really applies to this site yet. Hopefully, I could keep this site simple, running only HTML and CSS as it is right now.
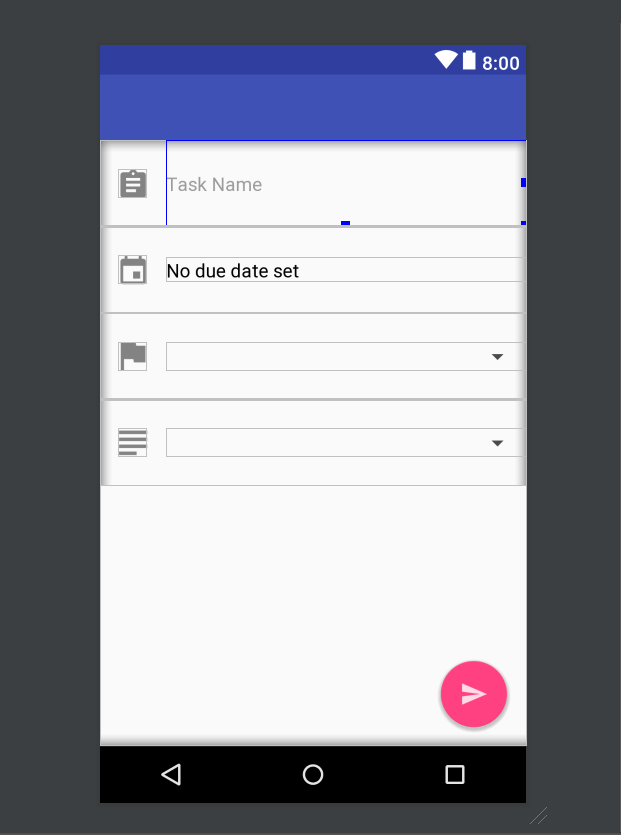
My main problem with CSS is aligning elements with each other. Android XML has a convenient solution with LinearLayouts and ways to adjust spacing, as well as RelativeLayout to align elements relative to each other. In the image below, the whole space is a vertical LinearLayout, and each element in the list is a horizontal LinearLayout with the icon and text. While this is most likely not the most efficient method, it is incredibly easy to visualize and design our app layout around this principle of nested LinearLayouts.
CSS doesn't seem to have an equivalent, and I don't want to resort to using tables and other junk instead of properly learning the conventions. Columns were the obvious solution at first, but can't have different lengths from each other unless I use various third-party frameworks. I'll just have to make do until I find a better solution, or find some framework that has similar functionality to LinearLayouts from Android.
Web development isn't as hard as I thought it would be, but there is still a learning curve and surprises along the way. Hopefully I can improve my skills and learn more things along the way, and I'm excited to see where this journey takes me.